XanderGlasses have a built-in microphone array that hears almost as well as a person without hearing loss. In places with ample background noise, or in settings where one person speaks softly, the built-in microphones may not hear clearly, and the captions may not be as accurate as in quieter settings.
To provide extra help in those situations, we include a powerful wireless microphone system. This slightly reduces background noise and provides the most accurate captions when it is clipped to the person speaking.
Which microphone system do I have?
Single-microphone system
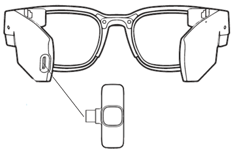
Our early edition of the XanderGlasses kit included a wireless microphone system with one receiver and one microphone, as shown in this picture:

If this looks like the microphone system you have, then please click this link for information on h.ow to use it.
Dual-microphone system (Hollyland Lark C1 Duo)
Many XanderGlasses kits have shipped with a more advanced wireless microphone system, consisting of two microphones and a receiver housed in a charging case, as shown in this picture:

If this looks like the microphone system you have, then please click this link to learn about your two-microphone system.
Dual-microphone system v2 (Hollyland Lark A1 Duo)
In August 2025, Xander started shipping kits with the next-generation version of the two-microphone system above. Operation is similar, but there are a few key differences.

If this looks like the microphone system you have, then please click this link to learn about your two-microphone system.
Single-microphone system
This microphone system has 2 small components:

- Wireless clip-on microphone
- Wireless receiver with USB-C connector
To use the wireless microphone
- Insert the USB-C connector at the end of the receiver into the back of your
XanderGlasses, into the USB-C port (where you charge the glasses). - When the receiver is connected successfully, you will see a small red light illuminate on one end of the receiver.
- Please note, once the receiver is plugged into the glasses, the glasses' internal microphones will turn off.
- Pick up the microphone, press and hold the power button until the green light comes on (about 3 seconds).
Positioning the Microphone in Different Situations
- Clip the microphone to the neckline or collar of your top. In situations with mild background noise, the mic may better pick up the voices of people near you and send captions to your XanderGlasses.
- Ask the person you’re conversing with to clip the microphone to their collar or shirt. This can be especially helpful if a person is speaking very softly in a noisy room or in a group setting.
- If you are in a small group setting with multiple people speaking, set the microphone at the center of the group, or closest to the person who speaks softest.
- If you are in a large auditorium listening to a talk or lecture, ask the speaker to wear the microphone. The wireless microphone system has a range of 65 feet.
Turning off the microphone
When you are done with the mic, power it off by holding the mic power button for 2-3 seconds until the green light turns off.
Charging the microphone
The microphone runs for up to 4 hours on a full charge. When the microphone light flashes red and green, the microphone needs to be charged. Please use the USB-C cable and charging brick included in your kit to charge the microphone. The microphone light will turn red when charging, and the light will turn off when charging is complete.
Dual-microphone system (C1 Duo)
This microphone system includes 3 components housed in a charging case:

- Two wireless clip-on microphones
- One wireless receiver with USB-C connector
Charging case:

To use the wireless microphone(s)
- Flip open the charging case and take out the receiver, which is the component in the middle.
- Insert the USB-C connector of the receiver into the back of your XanderGlasses, into the USB-C port (where you charge the glasses).
- Please note, once the receiver is plugged into the glasses, the glasses' internal microphones will turn off.
- Take out one of the two microphones from the case.
- The microphone will automatically turn on. You will see a solid blue light on the microphone when it successfully connects to the receiver in the glasses.
- You may also take out the second microphone from the case. Both microphones may be used at the same time.
Positioning the Microphone in Different Situations
- Clip the microphone to the neckline or collar of your top. In situations with mild background noise, the mic may better pick up the voices of people near you and send captions to your XanderGlasses.
- Ask the person you’re conversing with to clip the microphone to their collar or shirt. This can be especially helpful if a person is speaking very softly in a noisy room or in a group setting.
- If you are in a small group setting with multiple people speaking, set the microphone at the center of the group, or closest to the person who speaks softest.
- If you are in a large auditorium listening to a talk or lecture, ask the speaker to wear the microphone. The wireless microphone system has a range of 130 feet.
Important Note: Microphone Light Must Remain Solid Blue, Not Green
The microphones in this system include a noise cancellation mode that, unfortunately, decreases captioning accuracy. If the microphone indicator light is bright green instead of blue, the microphone is in noise cancellation mode. Simply press the yellow button on the microphone to switch off noise cancellation mode and return the microphone to the solid blue status light.
Turning off the microphone
When you are done with the microphones, simply place them back into the charging case. Then remove the receiver component from the glasses and place it back into the charging case as well.
Charging the microphones
The microphones run up to 8 hours on a full charge. To charge the microphones, simply place them back in the charging case. The microphones will fully charge inside the case within 1.5 hours.
When the microphone is inside the charging case with the lid open:
- a solid light in front of the microphone indicates the microphone is fully charged
- a blinking light in front of the microphone indicates the microphone is actively charging.
Charging the case
The charging case can fully charge the microphones up to three times before it, too, needs to recharge. You may recharge the case using the USB-C cable and power brick included in the XanderGlasses kit. Connect one end of the cable to the port in the bottom of the charging case, and the other end of the cable to the power brick. Plug the power brick into an outlet, and the case will fully recharge within 1.5 hours.
The battery level of the charging case is indicated by four small lights that illuminate on the front of the case when you open the lid. One light indicates 25% battery level remaining, two lights indicate 50%, three lights 75%, and four lights fully charged at 100%.
Dual-microphone system (A1 Duo)
This microphone system includes 3 components housed in a charging case:
- Two wireless microphones with magnet plate fasteners
- One wireless receiver with USB-C connector
Charging case:

To use the wireless microphone(s)
- Flip open the charging case and take out the receiver, which is the component in the middle.
- Insert the USB-C connector of the receiver into the back of your XanderGlasses, into the USB-C port (where you charge the glasses).
- Please note, once the receiver is plugged into the glasses, the glasses' internal microphones will turn off.
- Take out one of the two microphones from the case.
- The microphone will automatically turn on. You will see a solid blue light on the microphone when it successfully connects to the receiver in the glasses.
- You may also take out the second microphone from the case. Both microphones may be used at the same time.
Positioning the Microphone in Different Situations
- Clip the microphone to the neckline or collar of your top. In situations with mild background noise, the mic may better pick up the voices of people near you and send captions to your XanderGlasses.
- Ask the person you’re conversing with to clip the microphone to their collar or shirt. This can be especially helpful if a person is speaking very softly in a noisy room or in a group setting.
- If you are in a small group setting with multiple people speaking, set the microphone at the center of the group, or closest to the person who speaks softest.
- If you are in a large auditorium listening to a talk or lecture, ask the speaker to wear the microphone. The wireless microphone system has a range of 650 feet!
Important Note: Microphone Light Must Remain Solid Blue, Not Green
The microphones in this system include a noise cancellation mode that, unfortunately, may decrease captioning accuracy. If the microphone indicator light is bright green instead of blue, the microphone is in noise cancellation mode. Simply press the yellow button on the microphone to switch off noise cancellation mode and return the microphone to the solid blue status light.
Turning off the microphone
When you are done with the microphones, simply place them back into the charging case. Then remove the receiver component from the glasses and place it back into the charging case as well.
Charging the microphones
The microphones run up to 9 hours on a full charge. To charge the microphones, simply place them back in the charging case. The microphones will fully charge inside the case within 1.5 hours.
When the microphone is inside the charging case with the lid open:
- a solid green light in front of the microphone indicates the microphone is fully charged
- a solid orange light in front of the microphone indicates the microphone is actively charging.
- red or blue lights in front of the microphone indicate that the microphone is not fully charged and not actively charging.
Charging the case
The charging case can fully charge the microphones up to three times before it, too, needs to recharge. You may recharge the case using the USB-C cable and power brick included in the XanderGlasses kit. Connect one end of the cable to the port in the bottom of the charging case, and the other end of the cable to the power brick. Plug the power brick into an outlet, and the case will fully recharge within 1.5 hours.
The battery level of the charging case is indicated by the color and behavior of the light, according to the tables below:
When the case is not charging:
| Red, slow flash | 0-10% |
| Red, solid | 11%-25% |
| White, solid | 26%-70% |
| Green, solid | 71%-100% |
| Orange, solid | 0-97% |
| Green, solid | 98%-100% |